Best OBS Studio settings have been a talking point in the streaming genre for many years. But actually not that much has changed! The basic things are the same. This guide works for OBS Studio, OBS.Live and the almighty StreamLabs OBS.
I’ll try to make the whole process of finding the best setting easier for you. So you can get to the actual part of streaming faster. But first, let’s go over some mistakes that you should avoid from the get-go 🙂
- Common mistake 1: Trying to stream at 60FPS
- Common mistake 2: Bitrate over 3500+ without affiliate or partner
- Common mistake 3: You don’t get transcoders until you are an affiliate
- Common mistake 4: Streaming on Wireless
- So How Do You Actually Get The Best OBS Settings?
- Internet Speed Tester for Streamers
- Additional testing tips
Common mistake 1: Trying to stream at 60FPS
If you don’t have an i7 / Ryzen or equivalent or good graphics card for that. You most likely not going to be able to stream and play well. Your stream will buffer and drop frames and the stream looks like a slideshow. Or your game starts to lag. Starting out 30FPS is usually really good.
Common mistake 2: Bitrate over 3500+ without affiliate or partner
Twitch suggested bitrate is 3000-6000. But what you need to know about this is that most people with phones and lower-end computers can’t watch that kind of stream without the transcoders. It lags, it buffers.. It’s just an overall unpleasant experience.
Common mistake 3: You don’t get transcoders until you are an affiliate
Starting out streamers don’t usually get transcoders either so you won’t get the benefit from streaming at higher bitrates. Even if your internet speed and that beastly pc of yours allows it.
I would suggest streaming at the maximum at 720p / 30FPS and 2500 bitrate if you are just starting out and have not hit that affiliate status just quite yet. This way more people can watch your stream without buffering. 🙂 You can increase the bitrate when you have followers an audience that can watch the stream at higher bitrates.
[elementor-template id=”10226″]What are these magical transcoders you speak about?
Simply put. You can see if a stream has them by pressing Settings > Video Quality in the stream. Here is a pic from Twitch when you have them and when you don’t have them.
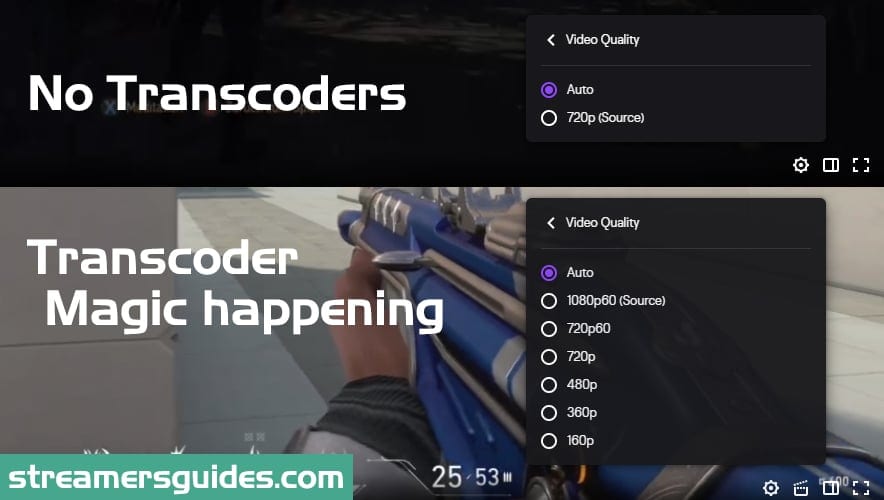
Transcoders by streaming platform:
Mixer: Partners get full access to transcoders – With Mixer Pro, you get access to a 480p transcoder.
Twitch: Partners get full access to transcoders, Twitch Affiliates get access occasionally. Twitch hasn’t exposed any “real” stats but the size of your audience in-streams seems to matter. How about the ones that are not affiliated? Really rarely.
Common mistake 4: Streaming on Wireless
If it’s just possible it’s best to use a wired connection when streaming. Streaming requires a constant flow of data that usually isn’t steady when being on a wireless connection. More information about this at OBS Forums. If you are suddenly dropping frames try out a lower bitrate and see if it helps.
So How Do You Actually Get The Best OBS Settings?
Okay, phew.. We got those spots sorted out really fast. I have talked about these things with hundreds of streamers and those little things are usually the things we go over with everyone.
But now let’s go forward for, the good part! First, we need to know your upload speed (upload speed is the most important part of figuring out the best settings). You can easily check your upload speed with the tool under here.
Internet Speed Tester for Streamers
Ding ding, the results are in! Pro tip with the settings is to look at your upload speed and use a maximum of 75% of that speed for upload bitrate in OBS Studio. That way you still manage to play games and download stuff.
Here is a little cheatsheet that you can use:
| Upload speed | Bitrate | Resolution | Framerate |
| 3 Mbps | 2500 | 1024×576 | 30 |
| 4 Mbps | 3500 | 1280×720 | 30 |
| 6 Mbps | 5000 | 1280×720 | 60 |
| 8-15 Mbps | 6000 | 1920×1080 | 60 |
OBS Studio Video settings
Go to: Settings > Video and setup Base (Canvas) Resolution as high as you use it. Then compare your stats from the cheatsheet what should you use. My upload speed is actually 48,1/Mbps (Yes.. In Finland we have beastly speeds). So I could theoretically go full-on 6000 bitrate if I would want to. But i don’t get any transcoders so there is no point in setting the bitrate up that high. This would just eliminate a lot of the viewers.
OBS Studio Output Settings
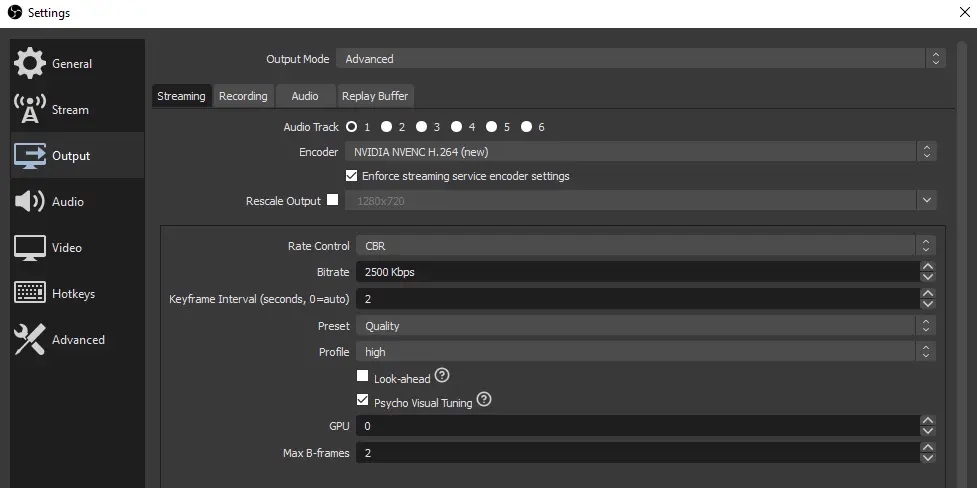
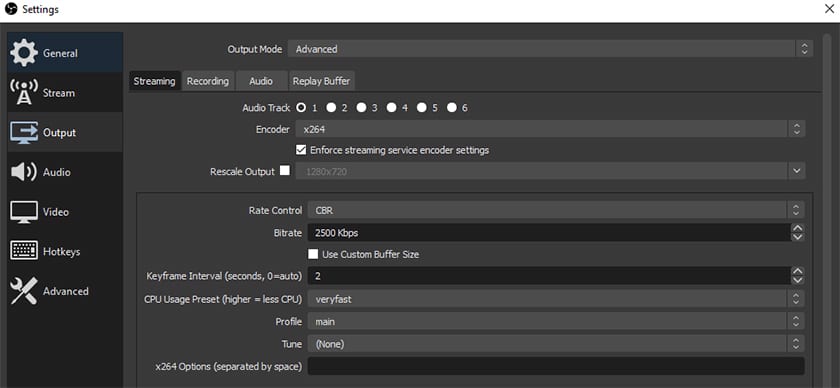
Now head over to the Output tab and change the “Output mode” to Advanced. We are going to change the Encoder (select NVIDIA NVENC H.264 (New) ) if you have the option. This allows your graphics card to do the work and it’s the most suggested option currently. This results in higher quality than other options. If you don’t see the option at all you are going to need to use x264 which uses your CPU to do the work.
OBS Studio output settings with Nvidia NVENCH H.264
OBS Studio Output settings with x264
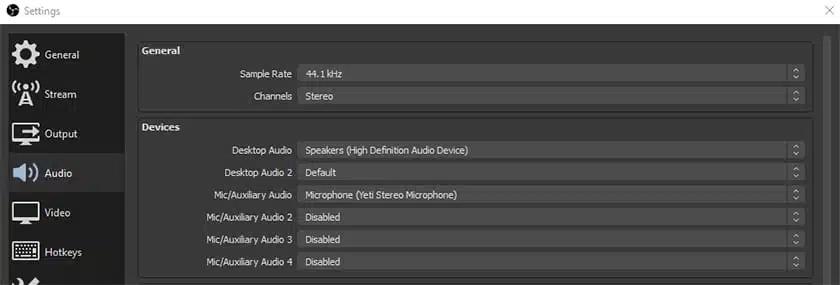
OBS Studio Audio Settings
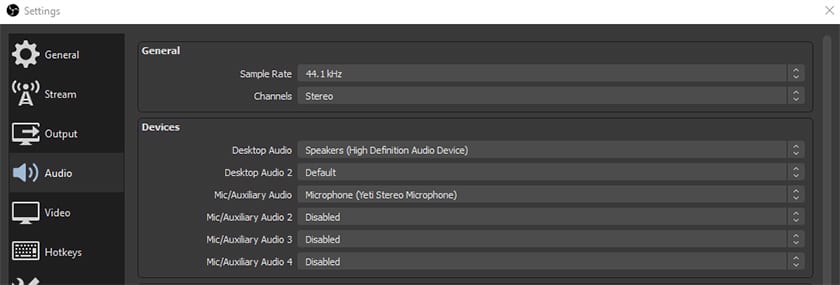
Onwards to the audio! This is super simple. You just need to setup Desktop Audio for the one you use for speakers then the Mic/Auxiliary Audio for the mic you are using. Here you can see me using speakers and the blue yeti. BTW! If you want to learn how to get the most out of your Microphone check this out.
Run the OBS Studio as Administrator
This is another neat trick that you can use! Right-click the OBS Studio and select properties. From there go to the Compatibility tab and there you can see run this program as an administrator. Put a checkmark on it, hit apply and ok.
Disable the Preview in OBS Studio
If you are still experiencing dropped frames disabling the preview will free up even more computer power for the games and streaming side of things. You can right-click the preview in OBS Studio and untick the “Enable preview” option.
Additional testing tips
Friend or viewer: It’s good to have a friend or a viewer watching your stream while you test these settings out. Many times the streamer has a better connection than the viewer and of source, your aim is to make the stream enjoyable for the viewer. This way you can sort out the buffering issues faster.
This overly sized image 👇 is an ad.. It’s not just any ad but a useful one it is!
Poof 🧙♂️ Now the ad is gone..
Setup a ballpark and increase: If you want to go higher than 2500 or test out the 60FPS. It is good to first find the “lag and buffer-free” spot first. Then you can increase +100 or more to find the spot that starts to lag. Twitch Inspector should give a pretty good estimate for you already.
Special thank you! For justAlesh. He hinted out the tips for Run the OBS Studio as Administrator and Disable the Preview in OBS Studio spots.
Leave a Reply